The Official SteelBook Custom Glossing thread!

howiesteed

sex panther ltd .CEO
Premium Supporter
Dec 30, 2013
2,234
burton on trent
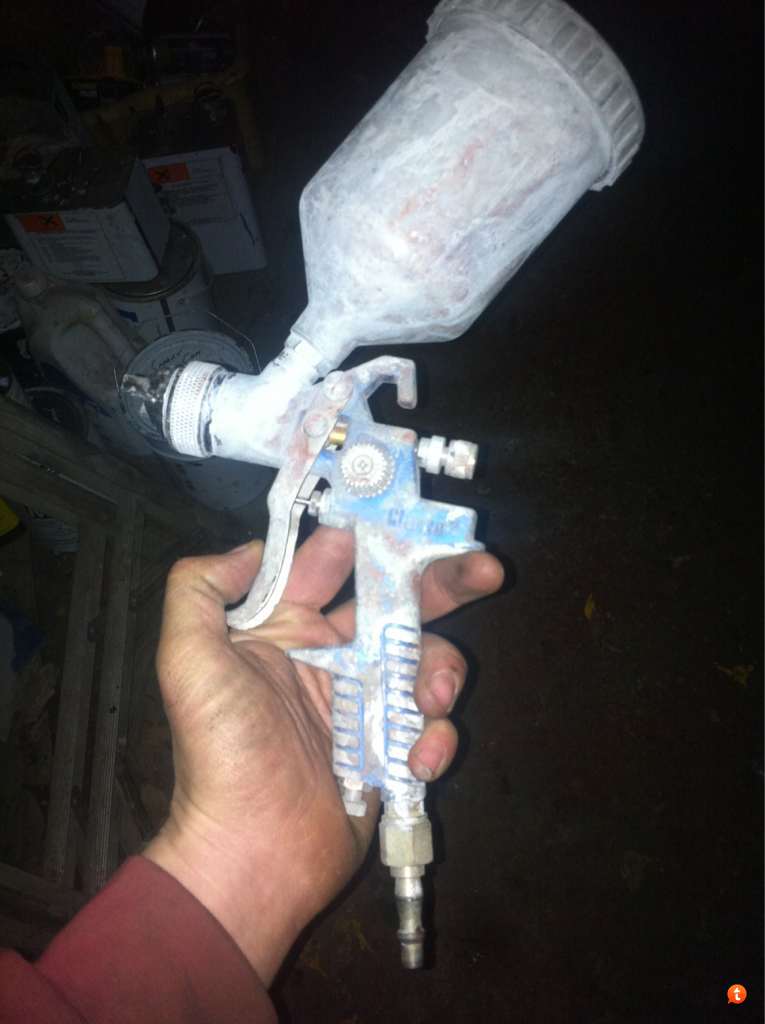
Here us a slight guide to the way I glossed mine ok here's what I used

A gravity fed spray gun
yvavu2y8.jpg


Then I used some accelerator and clear coat which I use when I spray cars also added is a slight but if thinners I think it's 2 to 1
apy7e8ar.jpg


The steels are wiped over with cleaners I get rid of grime and oil that fingers can lea e and any oils
desuse2y.jpg


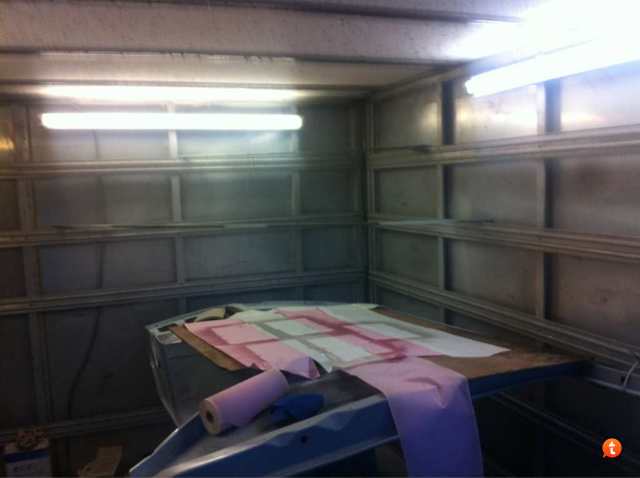
Then I spray it in a booth which is heated and has ventilation AND IS HEATED KNOWN AS AN OVEN
Basically it what I use to spray car bits
apuhypa3.jpg


Then spray and leave them to harden at least a day and this will be hard enough to polish to

ysu6egez.jpg


OH I FORGOTTO ADD A PICTURE OF THE HARDENER AND THE FACT I GET ALL KITTED UP LIKE WALTER WHITE FROM BREAKING BAD ....

WELL A BREATHING MASK AND OVERALLS AS THIS STUFF ISNT GOOD FOR BREATHING IN A CONFINED SPACE

Edited for trading
8ebyge6a.jpg


ra8ane2e.jpg


attachment.php


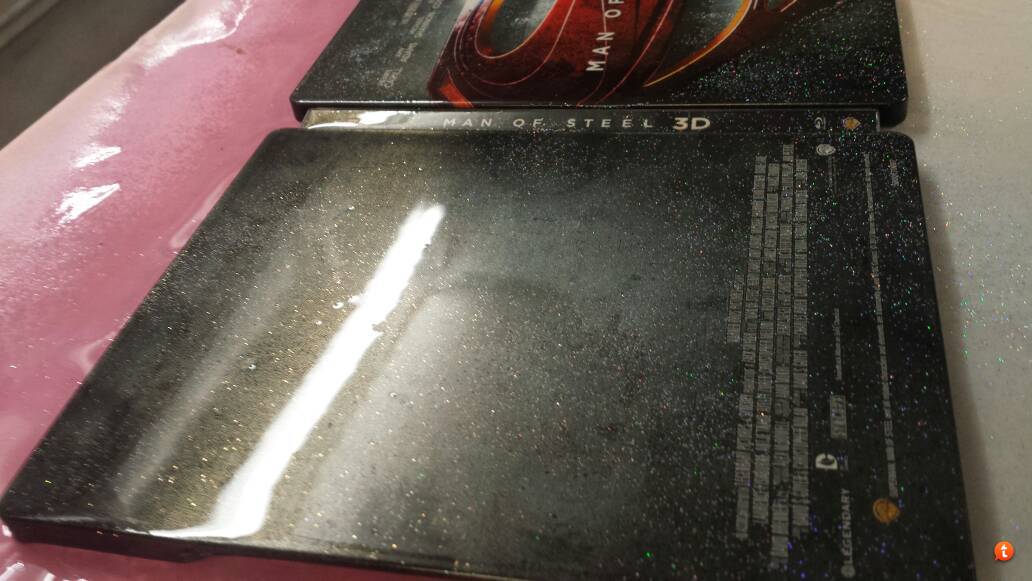
and can do sparkly too
ty7apuve.jpg
 
Last edited by a moderator:
They are bits in the air by the sounds of it not a lot you can do other than make everywhere clean and try not to move too much stuff stupid I know but it can't be helped heating g a steel is a good idea but using a hair dryer isn't as it means dust getting airborne but im guessing your using lacquer rather than gloss which is a hard coat and better imo but the heat will set the lacquer off better
 
  • Like
Reactions: ocielz and Icekalt
i use a spray what is like this rustoleum sorry i don't know the difference between gloss and lacquer :emb:

I just positioned them on my shelf and they look really good. Luckily you cant see the dots all the time :LOL: 
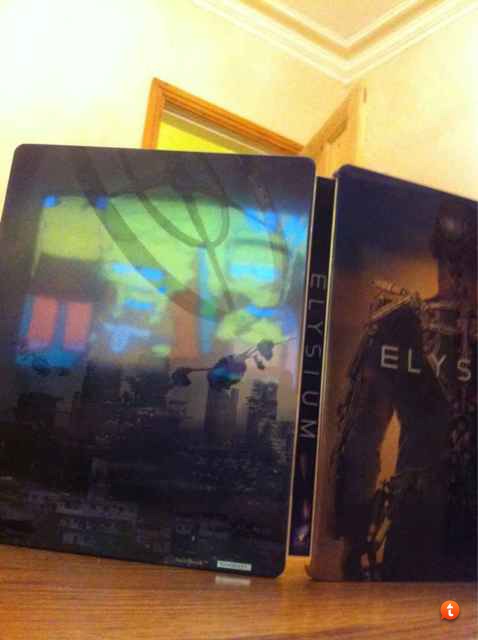
even on the Zombieland Steel which was the first one and did get quite messy you can't see them from more than 1m away :hilarious: will see how it looks like at daytime :hilarious:
6640256IMG_1257.JPG


Also with this gloss coat you don't need any of these plastic shelters since the coat is "protecting" the steels :D so as conclusion this test was still worth it even though no one would buy them with the bits visible if in hand.
 
Last edited:
  • Like
Reactions: ocielz
Yeah you can feel them, but even with the dots IM3 looks a lot better IMO, somebody mentioned they heat their steels up before they start would this make a difference ?

Yeah, I was getting those dots also. I started heating up the steel a bit before spraying for a couple of reasons:
1.) Makes sure that the cleaner has completely dried/evaporated
2.) Seems to help the spray stick a little better to the steel
3.) Helps the drying process to start as soon as the spray hits the steel.

I also started holding the can further away from the steel while I spray it as well as spraying at an angle. Once I started heating it up a bit, spraying from further away and spraying at an angle, I haven't had any of those dots. If you look at the results in my last post of the steels I sprayed last night, all 3 came out pretty solid

Thanks for the hins i will try this and clean the garage even more when i got new spray then i will finish Sherlock Holmes US, another thing is the Steel print quality wasn't that good you could see stripes but after the glossing they were vanished and its kinda relieves me i am not the only one having problems with bits in the air :D

@lgans316 Yeah you can definitly live with them. I regret nothing :D
 
  • Like
Reactions: ocielz and lgans316
Anyone glossed the Rush steel? Perfect for a car gloss coat no? :)

I don't think it would as I'd it was just a base colour then yes but it's got a metalicy finish to it and in my experience it'll come out but there's nothing wrong with it as it is im mo

---------- Post added at 09:06 PM ---------- Previous post was at 08:43 PM ----------

20h4i7b.jpg
[/IMG]

thats my current finish im getting
 
I tried sanding Goodfellas and Tropic Thunder some more today. The 600 grade sandpaper wasn't doing anything so I switched to steel wool. It worked a lot better but still couldn't smooth everything. Then I used Hagerty Silver Foam polish. The steels are obviously ruined and not even very glossy after sanding and using polish. What a waste :(

Goodfellas (you can see orange peel still on the bottom right):

iePelGSl.jpg


Smears:

Dp5BWV9l.jpg


Stripped paint:

gADtulel.jpg


Orange peel:

EdBbhzrl.jpg


SqIlLHpl.jpg


GJifYG2l.jpg


Tx411yGl.jpg


Tropic Thunder:

coWuBLAl.jpg


The back looks okay. Probably because of all the text:

nKY9sLhl.jpg


Spine looks okay too. I didn't try sanding it:

Bwxgcb6l.jpg


JxdWgmBl.jpg


After those disappointments I decided to try again using new advice. Instead of going slow, I went fast with the spray can, and I stayed even further away (at least 12 inches). Not only did it not get glossy, now it's covered in specks/dots! :angry: Three steels down the drain. I just don't get it. What am I doing wrong?

The Last Samurai:

ce2Wqrwl.jpg


I really hope someone puts together a video or detailed instructions because I am hopelessly incompetent at this! It's been such a frustrating experience. This is exactly what I've been doing:

  1. Wipe the steel with rubbing alcohol and a microfiber cloth
  2. Lay the steel open on cardboard. It's not completely flat if that matters.
  3. Spray the edges (How do you guys do this without getting paint on the rest of the steel? Cover it with paper???)
  4. Spray the front, back and spine at the same time. Overlapping and at an angle, at least 12 inches away.
  5. Wait a minute. For the first two steels I used a hair dryer.
  6. Spray coat 2.
  7. Wait a minute. For the first two steels I used a hair dryer.
  8. Spray coat 3.
  9. Wait until dry.
  10. Use wet steel wool to try to smooth out all the orange peel and layers of overlapping paint, and a paper towel to wipe it off and dry it.
  11. Rub the steel with the polish on a t-shirt, then clean it off with a wet paper towel, then dry it with a paper towel.
  12. Smash everything into a million pieces.
 
Last edited:
  • Like
Reactions: MK50 and lgans316
I'm really miffed too. I was very cautious before and the effect looked speckled of sort. This time I took more of a risk - held the can closer, and pressed harder and ended up with an overall better finish that actually resembled a gloss look. The only issues I have found is that the spine gets that orange peel effect and the edges seem to collect more gloss and kind of clumps up causing those ripple type effects. confused.com
 
  • Like
Reactions: MK50 and lolwut
Edges seem to collect more gloss and kind of clumps up causing those ripple type effects-

Need a steady hand for that I am afraid but I am in the same boat as you though I am not too concerned. :) This could happen if you spray from a short distance or don't stay focussed on a particular spot for long.

Glossed Star Trek Into Darkness (ES) and Toy Story 1. Looks amazing in hand. Colors of course pops out a lot and you can see some minute details as well that appeared smudged with the original finish. Will post some pics tonight.
 
This is one I did last night. The gloss seriously improves the detail and richness of the artwork. Here it is compared with a duplicate matte. Observe the 'orange peel' texture on the corners. :s Oddly enough though this one looks the best overall and it was sprayed up close and with heated steel plates.

Top - Matte
Below - 'Glossed'
IMAG0142.jpg

Side by side again.
IMAG0143.jpg

Closer look at the effect (sorry for image quality)
IMAG0144.jpg

'Orange peel'
IMAG0145.jpg

The gloss really add depth of colour that the photos don't show too well I'm afraid.
IMAG0146.jpg
 
Last edited by a moderator:
  • Like
Reactions: MK50 and ocielz
Bump since this was at the bottom of the last page. Is there any way to save The Last Samurai? Or possibly Goodfellas or Tropic Thunder?

I tried sanding Goodfellas and Tropic Thunder some more today. The 600 grade sandpaper wasn't doing anything so I switched to steel wool. It worked a lot better but still couldn't smooth everything. Then I used Hagerty Silver Foam polish. The steels are obviously ruined and not even very glossy after sanding and using polish. What a waste :(

Goodfellas (you can see orange peel still on the bottom right):
iePelGSl.jpg


Smears:

Dp5BWV9l.jpg


Stripped paint:

gADtulel.jpg


Orange peel:

EdBbhzrl.jpg


SqIlLHpl.jpg


GJifYG2l.jpg


Tx411yGl.jpg

Tropic Thunder:
coWuBLAl.jpg


The back looks okay. Probably because of all the text:

nKY9sLhl.jpg


Spine looks okay too. I didn't try sanding it:

Bwxgcb6l.jpg


JxdWgmBl.jpg

After those disappointments I decided to try again using new advice. Instead of going slow, I went fast with the spray can, and I stayed even further away (at least 12 inches). Not only did it not get glossy, now it's covered in specks/dots! :angry: Three steels down the drain. I just don't get it. What am I doing wrong?

The Last Samurai:

ce2Wqrwl.jpg


I really hope someone puts together a video or detailed instructions because I am hopelessly incompetent at this! It's been such a frustrating experience. This is exactly what I've been doing:

  1. Wipe the steel with rubbing alcohol and a microfiber cloth
  2. Lay the steel open on cardboard. It's not completely flat if that matters.
  3. Spray the edges (How do you guys do this without getting paint on the rest of the steel? Cover it with paper???)
  4. Spray the front, back and spine at the same time. Overlapping and at an angle, at least 12 inches away.
  5. Wait a minute. For the first two steels I used a hair dryer.
  6. Spray coat 2.
  7. Wait a minute. For the first two steels I used a hair dryer.
  8. Spray coat 3.
  9. Wait until dry.
  10. Use wet steel wool to try to smooth out all the orange peel and layers of overlapping paint, and a paper towel to wipe it off and dry it.
  11. Rub the steel with the polish on a t-shirt, then clean it off with a wet paper towel, then dry it with a paper towel.
  12. Smash everything into a million pieces.
 
Unfortunately I am not an expert at fixing mate. So better to wait for some nice piece of advice for howie.

Star Trek Into Darkness - ES - UK - Before

StarTrek_IntoDarkness_UK_Before_1.JPG


Star Trek Into Darkness - ES - UK - After - Botched job in parts but not too concerned (double coat). Check out the colors and the details on the back. :)

StarTrek_IntoDarkness_UK_After_1.JPG


StarTrek_IntoDarkness_UK_After_4.JPG


StarTrek_IntoDarkness_UK_After_2.JPG


Toy Story 1 - Zavvi UK - After pics only (single coat)

TS1_UK_1.JPG


TS1_UK_2.JPG


TS1_UK_3.JPG


TS1_UK_4.JPG


TS1_UK_5.JPG


TS1_UK_6.JPG


TS1_UK_7.JPG


---------- Post added at 12:55 AM ---------- Previous post was at 12:52 AM ----------

Hansel & Gretel Amazon.de - Before

HG_DE_Before_3.JPG


HG_DE_Before_2.JPG


Hansel & Gretel Amazon.de - After

HG_DE_After_1.JPG


HG_DE_After_2.JPG


HG_DE_After_3.JPG


TDK/BB - DE - Before

TDK_BB_DE_Before_1.JPG


TDK/BB - DE - After

TDK_BB_DE_After_6.JPG